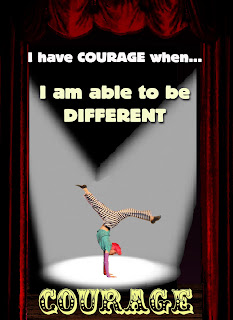
This is what I came up with:

There were also some questions that went along with it.
Reflection Sheet:
1.Describe how any of the design principles were used in the design of your poster. Be specific and use examples from your poster.
The principles of design are balance, proximity/unity, alignment, repetition/consistency, contrast, and white space. I think my poster used proximity/unity, alignment, repetition/consistency, and contrast. I used proximity/unity when I created depth by making my figure smaller and using large curtains. I used alignment when I placed my text and figure. I used repetition with my font and by using symmetry when it came to my background. I used contrast by using light font, a bright figure against a dark background.
2. What font(s) were chosen and why?
The fonts that I used were EDDIE and CLOWNINGWAY. I chose EDDIE because I wanted the lines that were used to describe courage to stand out but at the same time complement the writing underneath it. I used that font twice but in different sizes (36 and 48pt) and in the colours white and off white. I chose the CLOWNINGWAY font for the word COURAGE on the bottom because I thought it was very circus-y. I liked that because the picture that I cropped was from the circus scene in Seussical. I thought it suited the setting in the poster which was a stage.
3. How was colour used to attract attention?
For my background I used darker and more faded colours to really make the figure and the writing stand out. To draw more attention to the figure I created some spotlights, using grays and whites against a black background. I also used really light font colours, going from white to off white to a very pale yellow, in a descending way in order to pull the viewers eye in the direction of the figure, the colours helped with that process.
4. List any problems that were encountered in the design of your poster?
A few problems that I faced were creating good setting for the figure and making believable spotlights. The reason I cropped the figure was that the background wasn't what I wanted as it was unfocused. But by cropping the figure I had to make a new background and it took a while to decide on a decent setting. I settled for another stage and I pulled a picture of curtains from Photoshop. I then used a wooden floor image and adjusted the colors on it to make it appear darker. Then I took my figure and placed him accordingly, solving my background dilemma.
The second problem I had was the spotlights. As soon as I decided on a theater setting for my poster I knew I wanted spotlights on the figure to really make it look like a stage. So again I pulled a picture up, this on of a single spotlight. I then copied the picture and placed it but encountered my first problem. The spotlights met in the middle and overlapped each other, in a real picture when spotlights overlap that area is lighter. I had no way of creating that in Photoshop. So I tried to blur the image and erased the lines outline of the second spotlight to make it look more realistic. It turned out pretty well and so I left it as such.
5. List any improvements that could've been made to your poster.
I think that I could've improved the spotlights in my poster and possibly picked a different font for the first two lines of writing.
6. Rate the overall quality of your poster based on a level of 1-4, with 1 representing poor quality and 4 representing excellent quality.
I believe that the overall quality of my poster, based on a level of 1-4, should be a 3.
No comments:
Post a Comment